I recommend using larger needles. For these photos I used size 15 with Wool Ease Thick & Quick. I prefer using soft fuzzy yarns, but for the photographs I stuck to something that would be easier to see.
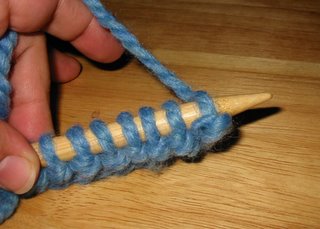 First, cast on some stitches. You know, whatever feels right for you. I cast on 10 stitches for this example. Next, knit that row. For your amazement, I have pictured here one knit row. Woo.
 OK now we're going to begin the row where the magic begins. First, knit a regular stitch. I knit continental style so this may look weird to some viewers.
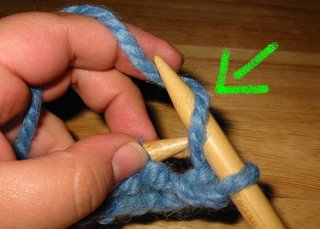 Now take the yarn and wrap it around the right needle.
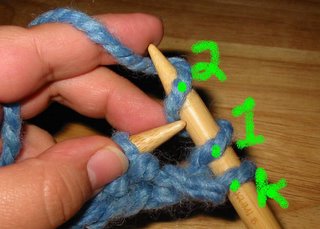 As you can see, my fancy graphics edumacation has sure come in handy. I've always stuck my nose up at the simple paint program that I now use happily. Forget the fact that I've crossed over to the dark side *gasp* and have been using a non-Mac for years. Ever since my PowerMac blew up (no exaggeration - apparently the fan IS handy after all) I crossed over and realized that XP isn't that much different from the Mac OS of olden days. But, I digress...wrap the yarn around the needle again. Please.
 So at this point you have the original (K) Knit stitch and the first and second yarn "wraps." Yep, not only am I design savvy but I also have an expansive and useful vocabulary. "Wraps." Next knit a regular stitch. Actually, if you want the dropped stitch to be shorter, you can wrap the yarn only once, or if you want it longer, you can wrap it more. It all depends on your personal preference. For now let's stick to two just to avoid any confusion.
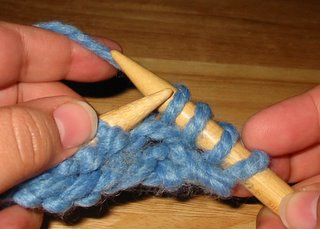 Let's see...1..2..3..4. Yep, just checking. After you knit a stitch, wrap two times, and then knit again you should have four "stitches" where you used to have 2. Coo'.
Repeat the pattern of knitting a stitch and wrapping the yarn around the needle the desired amount of times (in this case 2 times) until you get to the end of the row. You should end with a knit.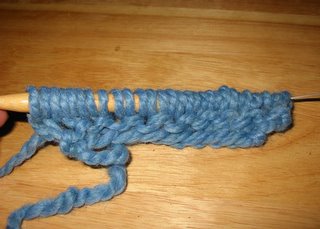 After you've completed the row, you'll have a bunch more stitches than you started with. They may even seem a bit crammed in. Perfect!
 OK, time to turn that sucker around and start the next row. Knit the first stitch. Here's where the stitches get dropped. You see those two stitches that you wrapped around the needle? Slip them right off the needle. It may seem all wrong, I mean, this is what we try to avoid, right? Expect the yarn to suddenly feel loose.
 After you slip off the stitches you will notice a large loop of yarn just sort of hanging out. Our evil plan is working. MUWA HA HA HA HAAAA!
Continue working down the row by knitting the knit stitch and dropping the two wrapped stitches.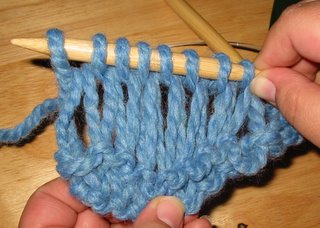 When you're done, you'll probably have to pull the dropped stitches into shape by grabbing the finished product and pulling it downwards. I usually either pull them down in sections or just grab a fist of yarn and yank the whole thing down with a quick tug. Umm, not sure if this is bad or not but it works for me. :)
 As you can see, you can cover a lot of territory with the drop stitch. This soda can is almost the same size as two rows of dropped stitches followed by a regular knit row. The drop stitch definitely comes in handy when you need to knit up something quickly! It's also wonderful for showing off texture of unusual yarn or for when you want to show-case soft yarn.
Well, that's it. If you have time, you should block the finished product. Enjoy!
4 comments:
excellent... thanks!
Ah, well... I didn't get it finished in time, but I told the gift recipient (secret Santa isn't so secret) that she would get it on Monday. But it's looking good!
After seeing this stitch on Crazy Auny Purl, I decided to try it too. EASY!!! I only do the YO once, so it's not as open...it IS colder here in the Black Hills than in So Cal....but it works up fast. I also am doing my scarf with 4 knit rows inbetween the YO row. I call it my gnome magic scarf.
I've used this stitch a few times...I really like it. :) It's fun to mix it up with different colors and fuzzy yarn too.
Post a Comment